Lights
Relevant to Blender v2.31
YafRay provides several kind of lights:
Spot light
This is fairly similar to Blender's Spot Light
<light type="spotlight" name="spot" power="30.0" size="80" blend="10"
beam_falloff="2" halo="on" res="512" blur="0.0" fog_density="0.20">
  <from x="-0.140436" y="4.175604" z="8.336139" />
  <to x="-0.140436" y="4.175604" z="0" />
  <color r="1" g="1" b="1" />
  <fog   r="1" g="1" b="1" />
</light>
|
size: Angle of the cone (half of Blender's one!).
blend and beam_falloff: same as in Blender.
halo: Whenever to cast volumetic light and shadows or not.
res: Resolution of the shadowmap (only for volumetric shadows by now).
blur: Blur applied to the volumetric shadows range from 0.0 to 1.0
fog_density: Amount of fog in the halo.
samples: Number of samples to use for halo rendering. By default the same as res. The more samples, the less noise.
from: Position of the light.
to: Target of the light.
color: Color of the light.
fog: Color of volumetric light.
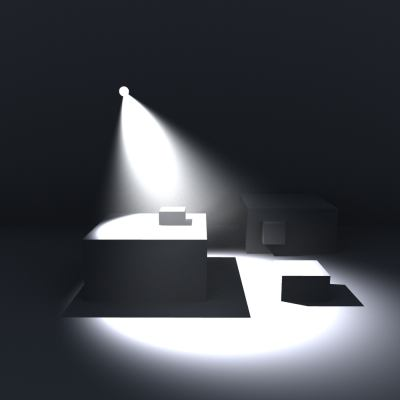
Point light
This is fairly similar to Blender's Lamp... but it casts shadows!
<light type = "pointlight" name= "omniLight" power= "1.000000" cast_shadows= "on" >
        <from x="6.372691" y="3.340035" z="2.815973" />
        <color r="1.000000" g="1.000000" b="0.000000" />
</light>
|
power: Light intensity.
cast_shadows: Whether or not to cast (raytraced) shadows ('on' or 'off').
from: Position of the light.
color: RGB color of the light.
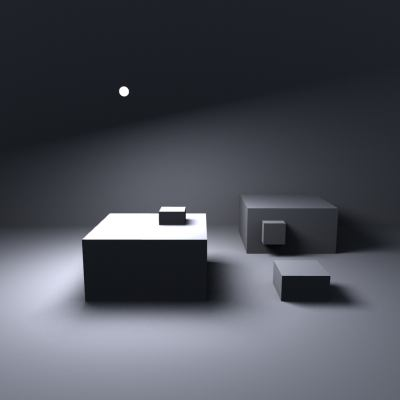
Pointlight, with Hemilight (white dot represents light position).
Sun light
This is again similar to Blender's Sun... but it casts shadows!
<light type ="sunlight" name="Lamp.001" power="1.000000" cast_shadows="on">
        <from x="0.026929" y="-0.071142" z="3.552329" />
        <color r="1.000000" g="1.000000" b="1.000000" />
</light>
|
power: Intensity of the sunlight.
cast_shadows: Whether or not to cast shadows ('on' or 'off').
from: Position of the light (direction is automatically towards the origin!)
color: Color of the light.
sunlight, with hemilight to provide some diffuse shading
Soft light
<light type= "softlight" name="softomni" power="1.000000" res="512" radius="5.000000" bias="0.300000" >
        <from x="0.026929" y="-0.071142" z="3.552329" />
        <color r="1.000000" g="1.000000" b="1.000000" />
</light>
|
power: Intensity of the light.
res: Resolution of the shadowmap.
radius: Radius of the blur (between shadowed and non-shadowed areas, creates the 'soft' look).
bias: Bias of the shadow map. 'Closeness' of the shadow to the object, if you have shadow that 'leaks' into areas it shouldn't, try decreasing the shadow bias.
Area light
This is a light shed uniformly by a quadrilateral
<light type "arealight" name"Lamp.001" power="25.000000" samples="64.000000" psamples="64.000000">
        <d  x = "-2.800729"  y = "-0.566380"  z = "3.235599" />
        <c  x = "-0.686398"  y = "-1.759042"  z = "3.833231" />
        <b  x = "0.541875"  y = "0.418420"  z = "3.833231" />
        <a  x = "-1.572455"  y = "1.611082"  z = "3.235599" />
        <color r="1.000000" g="1.000000" b="1.000000" />
</light>
|
power: Intensity of the light.
samples: Samples across area light surface.
psamples: Penumbra prediction (quality of blurred shadow edges).
a, b, c & d: Positions of the 4 corners of the rectangle that makes up the area light. (Beware of orientation!)
Arealight, with Hemilight (white dot represents light position).
Path Light
This indirect lighting system performs 'global illumination' by taking light from background and diffuse objects. It uses either a Monte Carlo raytracing algorithm (MC), or a Quasi Monte Carlo raytracing algorithm (QMC). The results from either system can be rendered using an Irradiance Cache.
Since MC uses random sampling the results can be quite noisy. The more samples you take the less noise you'll see. Of course this results in a longer render time. QMC sampling on the other hand produces less noise, but sometimes can result in discernible patterns in the shading of objects. Both noise and patterns can be reduced with yafray built-in Anti Noise Filter.
Path Light will produce nice radiosity effects. It can also produce caustics, however, as the photons that produce the caustics are not focused in a specific direction like the photon light, the caustic patterns will be softer unless a huge number of samples are taken.
<light type = "pathlight" name = "path" power = "1.000000" depth = "2" caus_depth = "4" samples = "16" use_QMC = "on" cache = "on" cache_size = "0.008000" angle_threshold = "0.200000" shadow_threshold = "0.200000">
</light>
|
power: Intensity of the light.
samples: Number of samples to take per pixel to get a quick and dirty preview of your render, you can set this number low, then raise it to get the final render.
depth: Number of ray bounces for each sample, at least 2 to get indirect lighting.
caus_depth: Number of ray bounces when passing through caustic objects.
use_QMC: Whenever this is set 'on' will use quasi montecarlo sampling.
cache: When this is set to on, Yafray will perform a prepass render to generate an irradiance cache.
cache_size: The size of the grid in the irradiance cache. Smaller values will mean a higher resolution irradiance cache (and longer prepass times).
angle_threshold: The angle between surface normals that determine whether the caching algorithm considers the surface 'flat', if the surface normal variation is higher than this, the caching algorithm takes more samples.
shadow_threshold: The minimum distance from the sample point an object can be before the caching algorithm takes more samples.
Using the Cached Pathlight
Using the Irradiance Cache feature can be tricky, the results are well worth it, as you can usually get the same quality image in a fraction of the render time.
The cache size is the size of a grid that the scene is divided up into. As the rays are shot into the scene, they intersect objects, the point at which the ray intersects the object will therefore fall into one of the boxes formed by the cache grid. At the time the ray hits this point the renderer first asks:
1. "Are there any other sample points within this box?" If the answer is no, a sample is taken, if there are other samples in the box it moves on to the next question:
2. "Are the surface normals of the other samples different to my current point?" (the angle of difference is defined by "angle_threshold"). If the answer is yes, a sample is taken, if the surface normals are all the same it moves on to the next question:
3. "Is the Intersection Point close to any other object?" (the distance threshold is defined by "shadow_threshold" and the distance between the intersection point and the existing sample points plays a part). If the answer is yes, more samples are taken, if no, the sample point is skipped and the renderer moves on to the next intersection point.
By doing this, the renderer finds areas of the image that need more samples (areas of high detail), and areas that need less samples (areas that have low detail, such as flat walls). Taking samples is the time consuming part of Global Illumination, by only taking samples where they are necessary the cached pathlight can produce fantastic images in a comparatively short time.
It does rely on some manual tweaking to find the 'sweet spot' for the settings for any given scene. If the cache size is too small, practically every sample point will be taken anyway, as the answer to question 1 will almost alway be 'no'. On the other hand if the cache size is too big, the distance in between sample points (which plays a part in determining whether another object is considered 'close') will be such that the answer to question 3 will almost always be 'yes'. Both of these situations will result in more samples being taken and the render taking longer.
Hemi Light
This indirect lighting system performs what is commonly called an 'Occlusion pass'. This produces a fast diffuse light in the scene by ignoring objects surface properties (colour) and just determining whether the point in question is in shadow or not. Because of this, the Hemilight will not produce colour bleeding between objects (unlike the pathlight). It uses either a Monte Carlo raytracing algorithm (MC), or a Quasi Monte Carlo raytracing algorithm (QMC). Since MC uses random sampling the results can be quite noisy. The more samples you take the less noise you'll see, of course this results in longer render time. QMC sampling on the other hand produces less noise, but sometimes can result in descernable patterns in the shading of objects. Both noise and patterns can be reduced with yafray built-in Anti Noise Filter.
The Hemilight will assume that the scene is evenly lit, as if a huge sphere surrounded the scene, lighting it with the color you specify in the 'color' tag. If you omit the color tag altogether, the hemilight will sample the render background if available (you can use this with HDRI backgrounds to get fast and realistic lighting simulations for compositing into a real scene).
<light type="hemilight" name="sky" power= "0.500000" samples = "20" use_QMC = "on">
        <color r ="0.800000" g ="0.900000" b ="1.000000" />
</light>
|
power: Intensity of the light.
samples: Number of samples to take. Higher samples will mean a smoother result, but longer render times.
use_QMC: Whenever this is set 'on' will use quasi montecarlo sampling.
color: Color of the diffuse light.
Hemilight with light blue colour value (model from www.amazing3d.com)
Photon light
This is a focused light to produce radiosity and caustics effects.
<light type= "photonlight" name="Lamp.002caus" power = "100.000000" photons = "50000" depth = "3" search = "100" angle = "15.000000"
        mode = "caustic" fixedradius = "0.100000" cluster = "0.010000" use_QMC = "off" >
        <from x="6.372691" y="3.340035" z="2.815973" />
        <to x="0.285646" y="0.149627" z="1.397566" />
        <color r="1.000000" g="1.000000" b="1.000000" />
</light>
|
name: Photonlight name.
power: Scales the effect of the photon light, whether it be caustic or diffuse.
mode: Sets the photon light to either diffuse, or caustic as detailed below.
photons: Number of photons to trace, the more photons, the more information to generate the photonmap from. Generally speaking, you should need less photons for diffuse photonlights.
depth: Amount of reflections (bounces) or refractions the photons will perform.
search: Number of photons to gather while shading. higher values will soften the effect (when increasing the search, you should also increase the fixedradius).
fixedradius: Search radius when looking for photons (number of photons looked for is defined by 'search'.
cluster: This defines the smallest unit in the photonmap created. The smaller the number, the finer the photonmap.
use_QMC: Whenever this is set 'on' will use quasi monte carlo raytracing.
from: Position of the light.
to: Target of the light.
angle: Similar to size value for the spotlight, angle of the photon 'beam'.
color: Color of the light.
Photon lights have two modes, "caustic" and "diffuse". In the first mode the light will draw reflected and transmitted photons, causing light to form caustic patterns of light that travel through transparent objects (ie objects that have the appropriate settings in their Object tag. In "diffuse" mode photons are reflected by diffuse surfaces in random directions to perform "radiosity" or "Global Illumination". In both modes only indirect light is stored (photons which have bounced at least once), so direct lighting still has to be done with a normal light.
Why not to work in both modes? You usually put different photon values for caustics than for radiosity. The needs change so is better to have two different lights for each task.
Tuning Photonlights
photons
Choose a good value depending on the task, for radiosity you'll need few photons. For the caustics it depends on what resolution you want in the shapes.
search, fixed radius and cluster
These settings are closely linked, you need to get the combination of all three settings right to achieve good looking results. The search setting defines how many photons to look for from a point, the fixed radius defines how far from that point to look for the photons. Once the photons have been gathered, the fixed radius area is gridded up into small 'clusters', the size of which is defined by the cluster setting. Any photons within the same cluster are averaged into one result (equivalent to 1 pixel in the photonmap).
If your diffuse or caustic effects look fractured into geometric shapes, the algorithm is not finding the required number of photons (search) within the defined radius (fixed_radius). To fix this you need to make sure there are enough photons within the search radius to reach the search amount. To achieve this, you could either increase the total amount of photons (photons), increase the search radius (fixed_radius), or decrease the amount of photons searched for (search). Increasing the number of photons will slow down the first pass, you will probably have to add a lot more photons to see much change . Increasing the search radius will show results quickly but is also reliant on there being enough photons in the scene initially. large differences between the fixed_radius and cluster settings (eg high fixed radius and low cluster) will greatly increase rendering time (which makes sense, as each sample (which will be large due to the high fixed_radius) is being split into a lot of tiny clusters (because of the small cluster size). A good rule of thumb is:
fixed_radius/cluster = sqrt(search)
This means that if you are trying for 100 photons (search = 100) then fixed_radius divided by cluster should equal 10 (sqrt(100)=10) so if we set a cluster size of .01 then fixed_radius should be around .1 ((10*.01 = .1) = (.1/.01 = 10))