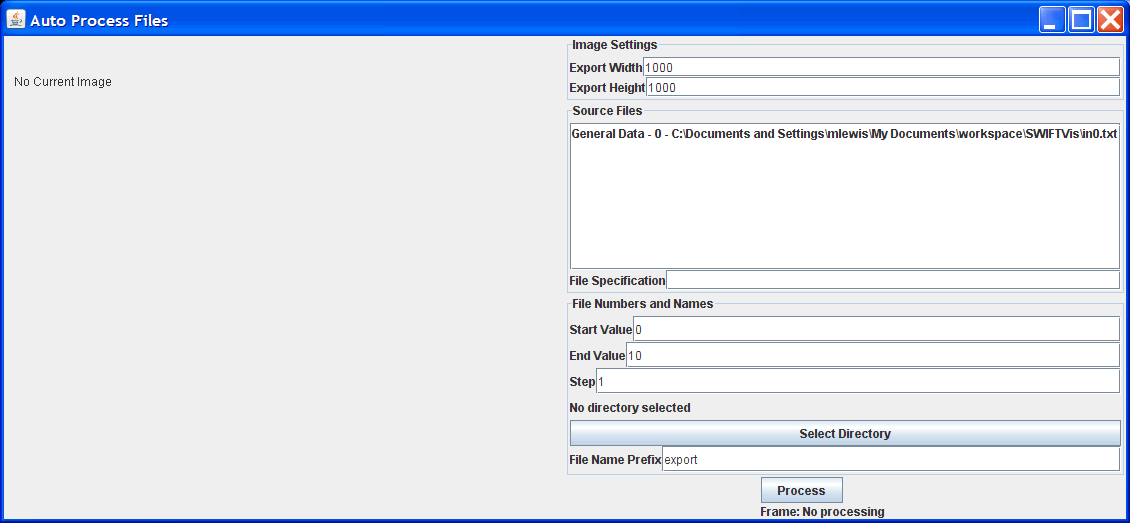
The MovieFilter has features that are good for making movies from a single large data file that contains a time sequence of information. Some simulations output information with one data file per time step. Turning this inot a movie can certainly be done by hand, but doing so can be very tedious. For this reason the auto processing feature was added. Auto processing can be reached through the main File menu of SwiftVis. It brings up a window like that shown below.
The panel on the left will display rendered images as they come up while the right panel lets you put in the options you want. Note that the Auto Process feature only outputs a single plot. If your SwiftVis graph includes more than one plot you will be notified that you need to select the plot that you want to write to file. The first two fields allow you to specify the size of the image you want to output in pixels.
Below this are settings for the files that will be read in. A list is given of all of the files that are currently read in by your graph. When you click on one of the elements in the list the file name will appear in the text field labeled "File Specification" so that you can edit it. The AutoProcess feature works by replacing part of the file name with a numeric value. The numbers are specified in the third section. Inside of the file name you can specify this number in one of two ways. It can only be given once in each file specification. The more flexible method is to place a formula using p[0] inside of curly braces. So in the example above I might replace the part of the file name "in0.txt" with "in{p[0]*10-3}.txt". Of course, most of th time you won't need to do any math with the numbers you are running through and could use "in{p[0]}.txt". Because this is so common, a shortcut has been provided for it. Simply put a "#" in the file specification and it will be expanded to "{p[0]}" when it is processed.
When you run auto processing SwiftVis counts through a specified range of numbers. You get to specify the range and the step to take in the third group of options. The range is inclusive. When you click the process button SwiftVis will begin at the start value and read the different files inserting that numeric value then output the image draw by the plot. The numeric value is increased by the step and this is repeated. Note that file specifications that do no contain a # or {} will not be reread each time.
The image files are output in the directory you select. Each file will be given the name specified in the prefix text field followed by the number and ".png". This process can take a while so feel free to work on something else while it is happening. The label at the bottom of the right panel will tell you what frame is currently being processed. The image on the left will not always update immediately. It will show the last frame when the processing is done.
To help with animations in auto processing there is an Auto Process Source that you can use to get the current number being processed into the SwiftVis data flow. It produces a single element with one parameter that is the numeric value currently being processed.
There are some other features in SwiftVis that are closely related to auto processing. The Input Collection Filter provides a method for storing data from a single input across multiple updates. Of course, if the number of files is large manually rereading all of them through the GUI could be time consuming. This reading of multiple files can also be accomplished with the auto process feature. If you want to use it for that purpose and not to output images, simply blank out the file name prefix. Batch Processing also provides a way to produce images from a large number of input files but it doesn't require opening up the GUI.