Mist
Mist is something which can greatly enhance the illusion of depth in your rendering.
Basically Blender mixes the background colour to the object colour and enhances the strength of the former as the object is further away from the camera. Mist settings are shown in Figure 4.
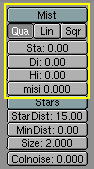
The Mist Button toggles mist on and off, the row of three TogButtons below states the decaying rate of the mist, Quadratic, linear and Square Root. These controls the law which governs the 'strength' of the mist as you get further away from the camera.
The Mist is computed starting from a distance from the camera defined by the Sta: button and is computed over an interval defined by the Di: button. Objects further away fromn the camera than Sta+Di are completely hidden by the mist.
By default the mist uniformly covers all the image, for a more 'realistic' effect you might want to have the mist decrease with quote (z). This is governed by the Hi: NumButton. If it is non-zero it states, in blender unit, an interval, around z=0 in which the mist goes from maximum intensity (below) to zero (above).
Finally, the misi: NumButton defines Mist intensity, or strength.
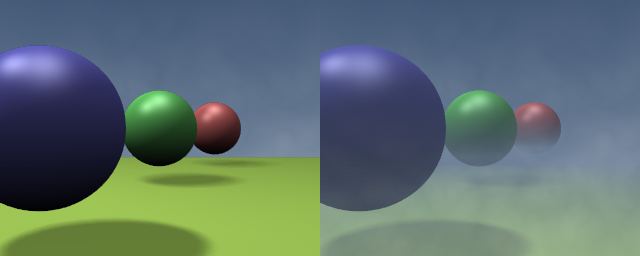
Figure 5 shows a possible test set up.

Figure 6 shows The result without and with mist. THe Settings are in Figure 7; the texture is a plain procedural cloud texture with 'Hard' noise.

 | Mist distances |
|---|---|
To see what the mist will actually affect select your camera, go to EditButtons (F9 and hit the Show Mist TogButton. The camera will show mist limits as a segment projecting from the camera starting from 'Sta' and of length 'Di'. |