Part 3
GI and other features
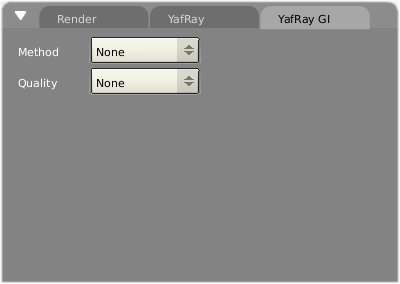
Yafray supports Global Illumination*. We have to go back to the Render tab to learn more about Yafray's implementation of GI. The first look at the Yafray GI tab and you might think. Oh! It is so easy, you are right the features available are simplified for your use. The available options are Method and Quality, lets have a look at them one by one. The quality is the same for both and is explained later.
The available Methods of GI
Skydome
While Skydome is simply a method to have lighting from the sky or more appropriately the atmosphere, it does not provides full GI in the true sense, as it does not takes into account the indirect light bounces on the surfaces of objects. Rather it affects the light in the scene by the colour of the atmosphere and also the diffusion of light in the atmosphere is controlled by it. For example in the default scene the colour of atmosphere was set at reddish (chosen just to clearly identify the affect). See Figure 19 for how the diffusion effects the scene.
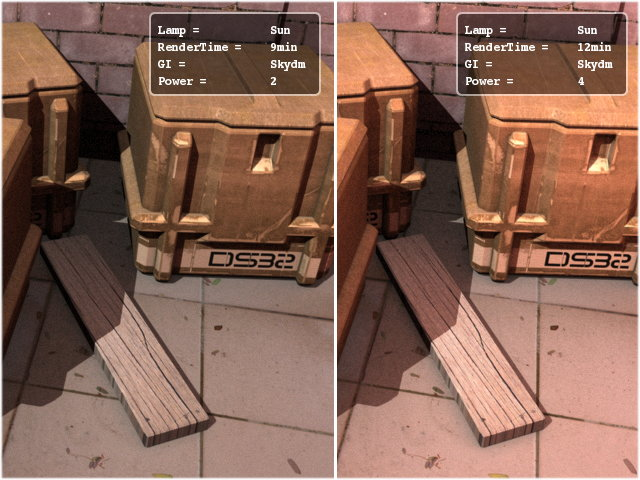
The colour of the background or atmosphere can be changed in the Word Panel (F8). You have to enable the world for Skydome to work fully. The Skydome offers no other features. The Skydome is faster method of GI, while its results may not be physically more accurate, its results are not too bad to ignore for the speed advantage it offers.
Full
On the other hand, the Full option takes into consideration the reflected and/or refracted light bounces (or indirect light) on neighboring surfaces. This method is a very close simulation of actual lighting in the real world, and that is why the GI produces more photo-realistic images than any other method used in CG, that is also why it requires higher computations and is slower.
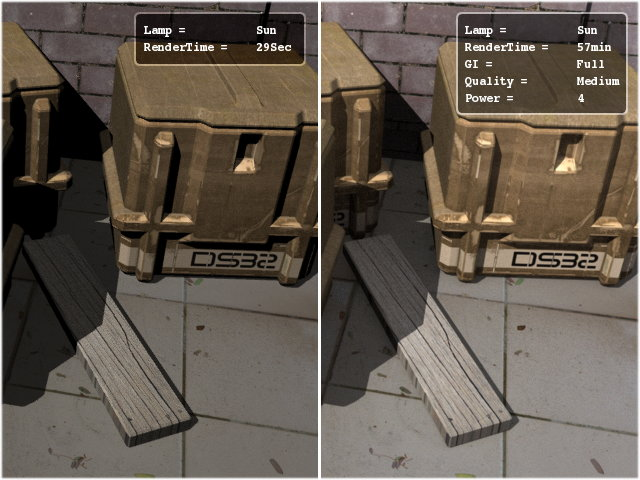
Notice the difference in realism between the two parts in Figure 20.The light bounces provide enough diffusion in the second part of the image, which lights up the shadow portion in the scene according to the distance of the surfaces in contact. While the first part has approximately similar shadow depth through out.
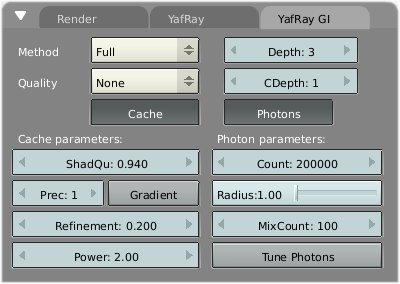
Features for Full method of GI
Depth:
This refers to the total number of light bounces for one reflected or diffuse ray. Generally the depth 3 works best for normal scenes. Increasing the depth results in higher amounts of calculation per ray.
Cdepth:
The Cdepth is nothing but the bounce depth for caustics, or for the transparent materials like the glass, gems, liquids etc. Higher computations are required for caustics calculations, that is why the GI in CG keeps separate the normal lights with photons, even though in the real world the photons are the actual light particles. For better quality of caustics you will need to have as much as 3-5 Cdepth or more for detail.
Photon:
This photon button should not be confused with the photon lamp. This is only used as a helper in global illumination for Yafray and bears no relation with the caustic photon lamps or caustic photons.
Count:
The count refers to the total number of photons to be made available in the scene for helper in GI. The number of photons will will vary for the scene, but higher numbers in the scene will provide smoother results, again its at your disposal to find time/quality limit.
Radius:
This refers to the distance within which the photons calculated have higher precision value to effect the GI, outside which the photons do not effect the scene much. So the Idea is to optimize the radius to the size of the area where better GI calculation is required. Keep the radius half the size of area.
MixCount:
This allows you to choose the number of photons which should be kept inside the Radius. The Radius and Mix Count make up your photon map. The photon-map is nothing but the optimized area for photons used in GI calculation and Yafray sufficiently processes the sampling and photon gathering on the photons inside the photon-map and leaves the photons outside the photon-map.
Tune Photons:
This allows the re-use of successful gathering of photons and positions from cache, which helped in GI calculation on previous render, and only re-compute the other photons for faster result. It is may not necessarily faster in every rendering but can provide good speed improvements generally. Due to speed improvement it is good to use it during test renders once you come close to what you wanted. You can disable it after you are satisfied with the test renders and want to create the final version of the image to do the full computation again.
Quality:
The quality dropdown list allows you to choose the quality level of GI for both the Skydome and Full GI methods. Quality setting allows control over the number of samples used to sample in GI. Since its use is automatic by default, it will try to used maximum value for MultiPasses and samples per pass depending upon the quality level. If you want, you can disable the AutomaticAA manually and can instruct Yafray accordingly.
Other features of Yafray
Anti-Aliasing:
The Yafray tab in Rendering options window lists the options for manual control over anti-aliasing. Press the AutoAA button to un-hide the manual settings.
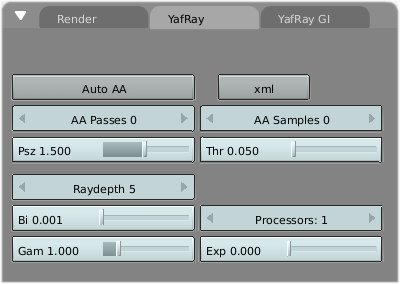
AAPasses: It is used for the number of passes to be used for Anti-Aliasing. The higher the passes, the better the results, longer render times also. While using passes of more than one, every pass samples the total number of samples chosen in AASamples for every pass, thereby achieving better AA of pixels in noisier areas. If the results are noisier in a single pass you can increase the number of passes for better control and also a higher number of samples per pass. Single pass anti-aliasing with higher sampling, is not necessarily better than lesser samples with multipass.
AA Samples: The number of samples per pass. The total AA sampling can be calculated by multiplying AApasses with AAsamples. In our case for the the final blurred image for the DoF used below, we have used 4x4=16 anti-aliasing samples.
Psz: The psz is the >Pixel filter size>, that is used during the Aliasing calculations for aliasing the overlapping of neighbouring pixels.
Threshold: This sets the threshold or the maximum brightness difference with the neighbouring pixel, when this is above the chosen level, extra samples are taken until the result is below the threshold limit or maximum samples/passes are reached. Lower threshold means more pixels will be antialiased, so at 0 all pixels in the render will be anti-aliased, when 1 no anti-aliasing is done.
Raydepth: This effects the maximum number of bounces a reflected/refracted ray can make. This is only important for glass and mirrors, higher ray depth will improve the quality of the reflection/refraction in the glasses and or mirror.
The Depth of filter
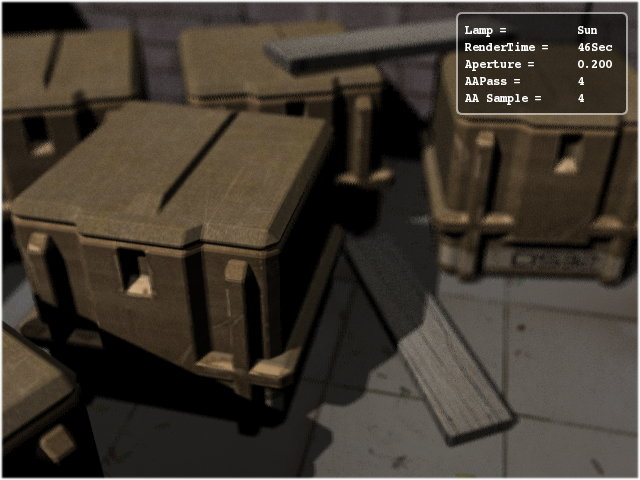
Yafray supports the real camera like DoF. The DoF of filer setting can be accessed easily. First select camera in view port then press F9. You will see a tab along with the Camera tab named Yafray DoF. In the Camera tab enable Show limits, doing this will allow you to see a yellow cross on the Show limits line of the camera in Viewport. The yellow cross is what we need to put at or near the objects we want to have sharp focus on. That distance can be set by the DoFDist numeric button. The Aperture setting is the value you need to change to get the required DoF you want. Normally a setting in between .100 to .500 will suffice for most scenes.

How to remove the artifacts in DoF rendered scenes. DoF filter requires more samplings per scene to get the right amount of blurring. To do that you need to disable Automatic AA in Yafray tab in Render panel. Here try to adjust the AAPasses and AA Sample accordingly. If you have large aperture settings then you need to have multiple passes plus higher samplings per pass. Increasing anti-aliasing will also increase the render times.
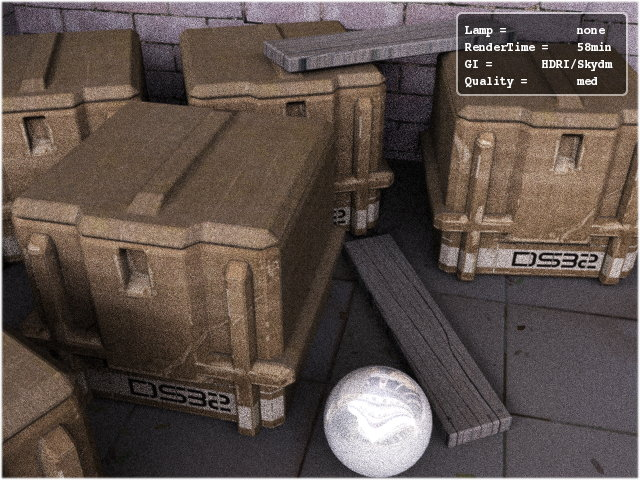
HDRI or High Dynamic Range Illumination
Yafray has HDRI support. To use this go to World buttons F8. Go to Texture and Input tab and add a new texture. Then go to texture selection F6 select Texture type as image, press Load image button, locate the HDR file, select and press Enter. Blender will not show the HDRI image in the World tab, however it is loaded automatically during rendering. You can also increase or reduce the exposure of the HDRI from the Texture brighteners button in the colour tab in texture window (F6). The possible exposure settings are -1,0,1, for brightness' sliders at 0,1,2. This is because HDRI exposure can be modified in integer values only. For the final step, use any one of the GI methods. Generally Skydome will work fine.
Closing comments
I would like to thank eeshlo, to an large extent I was motivated to learn about Yafray because of him, and thus was able to write this tutorial, and also for his help in solving my queries. Thanks also goes to Dreamsgate for helping in the editing and support for this document.
This tutorial is not finished, as there are several aspects which I have not tried myself, like caustics, and GI techniques for certain types of renderings. So I call this tutorial version 1. Later improvements will not necessarily come at regular intervals. If you have any queries or have some point that I overlooked or misunderstood in the matter written above. I would be glad to hear from you. Also welcome are the suggestions for improvements. My mail-id